ErgoBlue
Deprecated! I’ve since moved to a self-designed & built keyboard, so I’ve stopped doing anything with this code. Go check out FreiKey for the latest. I did a bunch of clean up, resulting in a much more reliable keyboard
Stuff for a fully wireless ErgoDox based on a Gist from the fabulous Wez Furlong. If you read his Gist, he explains some of this. I’ve documented what I’ve done along the way.
This was my first time doing anything real with Arduino or low level electronics at all, so some of this stuff is absurdly more detailed that it probably needs to be, but I’m also an experienced software developer, so I’m sure I glossed over a bunch of stuff that seemed simple to me (but may not be to you, dear reader). Apologies in advance…
Shopping List
- 2 AdaFruit feather nRF52’s.
- 2 LiPo batteries to drive the wireless modules. I bought 500 mAh LiPo batteries, because I’d hoped they would last long enough for me to not have to charge very frequently. They last a couple days, so I’ll be adding on/off switches to the keyboard halves to reduce power usage while I’m not actively using the keyboard. I’m a bit of an idiot, because I didn’t realize that they had 2500 mAh LiPo batteries. They would be better. (I bought a couple of 2000mAh for a more custom keyboard project I’m working on. I might try to get fancy and see how to reduce power consumption, too)
- A couple of ErgoDox keyboard plates. I purchased a spare ErgoDox Infinity from MassDrop a while back (when they were still selling them), just to have around in case either my home or work keyboard died. I find all the cords for the ErgoDox really annoying, so I decided to grab the keyswitch plates and try this out. I may wind up changing from this keyboard to be a custom build instead. I find the lack of a decent place to put an ‘Arrow T’ pretty irritating, as well, so maybe sometime in the future I’ll get as adventurous as Wez and make my own custom keyboard plate.
- About 80 1n4148 ‘signaling’ diodes. (I bought 250, because they’re cheap). I understand, logically, what a diode is, but I have zero understanding of the difference between a schottky diode, zener diode, or whatever. Everything I’ve read says to just use 1n4148’s, so I bought a bunch from DigiKey. I haven’t received them yet, so I’m just reading up on a bunch of stuff, and horsing around with the AdaFruit devices.
- Key Switches. Cherry MX Clear’s are what I’ve used, but I recently acquired a glob of Zealios, which are also firmer than Cherry Brown’s, so I’m gonna try the Zealios Purple’s on the main keys, and the Clear’s on the thumb clusters.
- Key Caps. I have a bunch of these hanging around, because I have a problem.
- (Optional) Power toggle switches. I snagged these after the whole project was complete, because as I mentioned above, I kinda want the thing not to require constant plugging in just to charge. In the future, I’ll definitely grab bigger batteries. 500mAh is too darned small.
- A MicroUSB Cable or two. Find one in a drawer somewhere. These things are everywhere, like Easter grass or Christmas Tree tinsel. They multiply when out of sight, like a weird combination of rabbits, and Weeping Angels.
- Some kind of case that works. For me, I bought a chunk of maple and used Autodesk Fusion360 to model a nice case with spots for the AdaFruit board and the batteries, because I have a little CNC machine. Given that we don’t have the PCB layer from the original ErgoDox Infinity, I suspect you could do something with that case if you tried. I modified it for my normal ErgoDox because I want the keyboard tented (lifted up in the middle), but you could probably find a decent spot for the AdaFruit device and a battery if you really look…
Getting started
To use the AdaFruit devices, I had to download an older version (1.6.14) of the Arduino IDE. The current version didn’t want to let me follow AdaFruit’s directions to get their BSP (Base Software Package?) installed into Arduino.
I also had to jump through a number of hoops to get nrfutil functioning
properly.
I really hate Python, in no small part because every time I cross anything written in Python, it doesn’t work properly on my Mac. This may be because the Mac is configured by my employer, but fundamentally, there’s just a whole pile of crap to get through if you have a machine that you’ve tried to use Python on. Those people might want to take a long hard look at Node. Oops. End Rant.
Once I had the code compiling, I tried installing the drivers for the AdaFruit’s but found myself having to try a variety of different things to get them working correctly. I’m using a Mac to do all this. Perhaps it’s easier on PC (but my PC died a couple weeks ago, and I don’t want to fix it yet…)
Once you’ve got the AdaFruit devices working, you upload the “sketch” to each device. The right hand device is the ‘master’ and is the name of the keyboard you’ll see when you try to connect it to your computer (or iPad, or phone, or whatever). The left hand devices is the ‘slave’ and all it does is communicate the state of the keys to the master device.
Update: No Arduino IDE needed (or actually used, currently)
I was annoyed enough by the fact that the Arduino IDE was writing the original
file over the top of symlinks that I stopped using it as an editor (it’s pretty
crummy as an editor anyway). So, while on airplanes last week, I migrated to a
little Makefile that is much faster than the Arduino build. make flashl -j
will build and flash the left half. flashr instead will flash the right. If
you don’t want to flash, but just want to compile the code, just a plain make
-j will suffice (-j does multi-process build, which is way faster, even on my
wimpy little manager edition MacBook 12” than the single process, single
threaded Arduino build)
Designing the matrix
First, go and read about keyboard matrices. There are a number of well written explanations for how they work. Here’s the one I found that I liked the most. The important points (at least for me) are:
- Each key must be a unique combination of ‘row’ and ‘column’
- You need to make sure to wire the diodes in parallel. If you wire them serially, things may be unhappy (they may not, but parallel is the right way to do this.
It has occurred to me that I might be able to cannibalize the ErgoDox PCB’s for some/all of the wiring, but that just seems like a pain, and I’m not ready to destroy one yet. (Update: I could totally see myself destroying one now, but I think I’m going to try using my CNC to make a PCB for a future evolution of this project.)
I grabbed the DXF for the ErgoDox plate and printed a few out to try to draw a
key matrix I was happy with. First, I drew a plain matrix, like so:
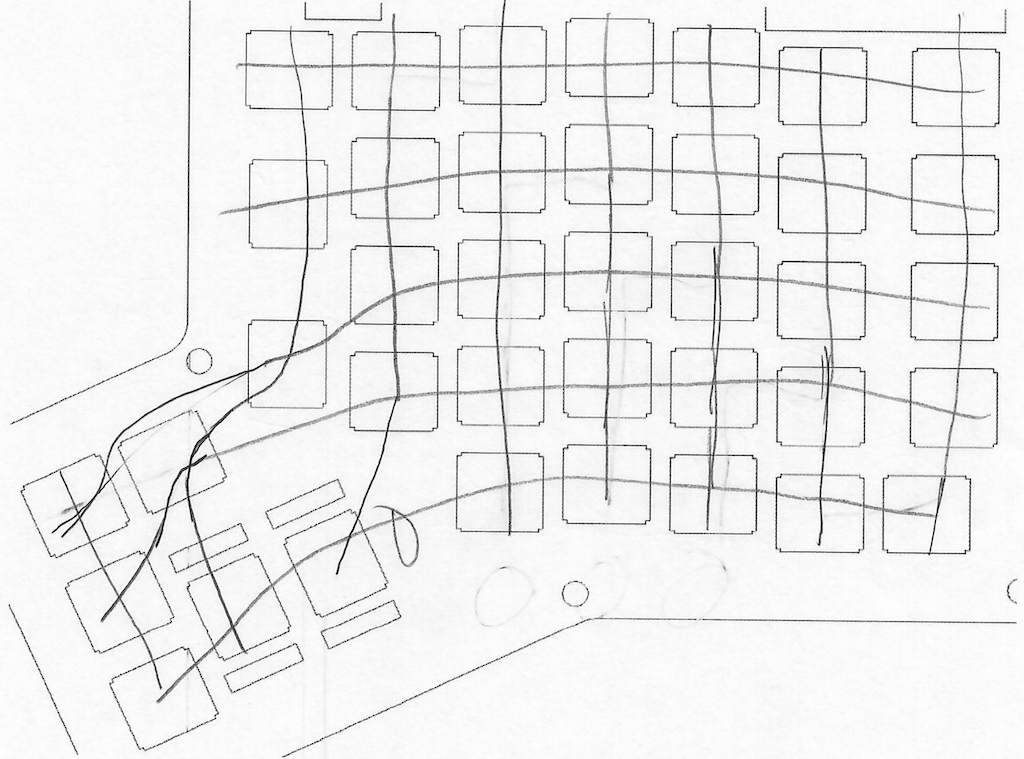 As you can see, I’m a terrible artist, and also screwed up a couple things, but
erasers are helpful. Maybe I’ll turn into into something less hand-drawn in the
future. Probably not.
As you can see, I’m a terrible artist, and also screwed up a couple things, but
erasers are helpful. Maybe I’ll turn into into something less hand-drawn in the
future. Probably not.
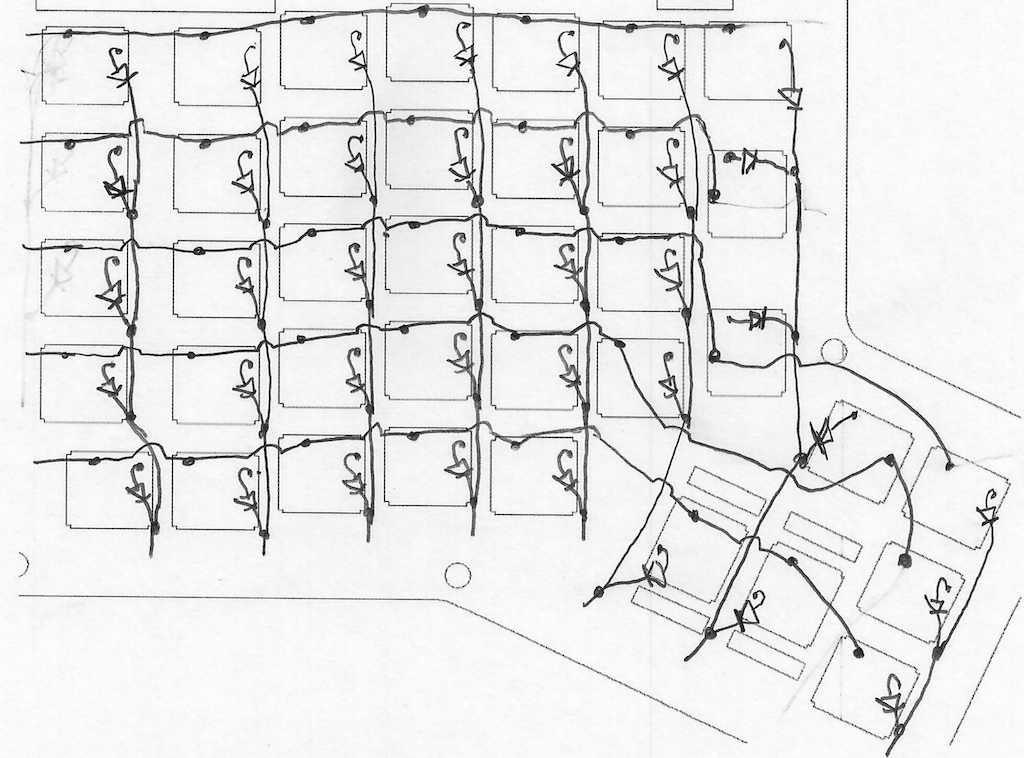
Once I had a matrix that made sense to my brain, I grabbed switches, stuck ‘em in the switch plate, and looked at where the connections go. Based on that, I drew up a wiring diagram for each side:
Here’s the right hand side:
And here’s the left:
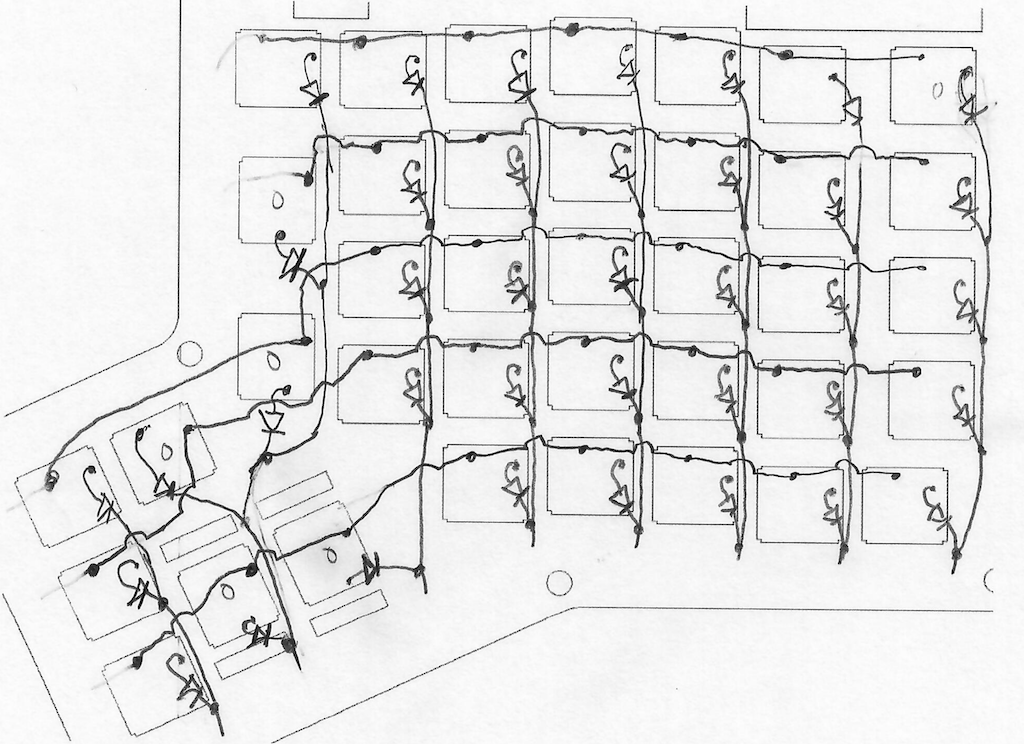 I know: I’m an artist. My talent is wasted managing a team of brilliant
engineers.
I know: I’m an artist. My talent is wasted managing a team of brilliant
engineers.
Now, the work!
Soldering
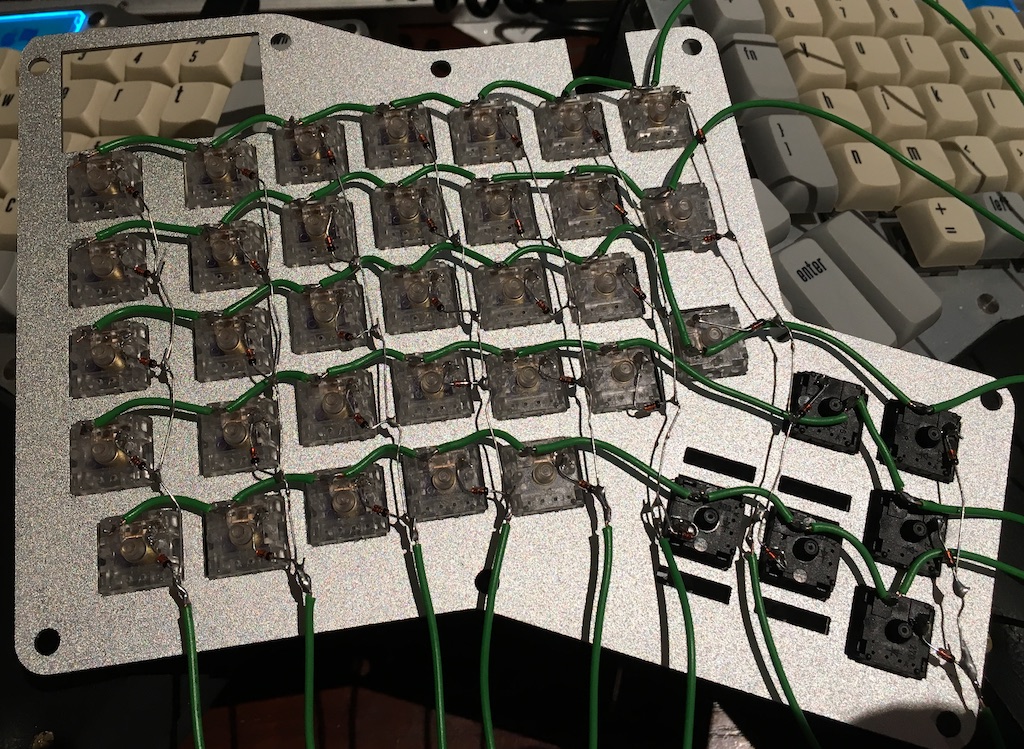
First, I stripped wires so they fit across the rows, then soldered them:
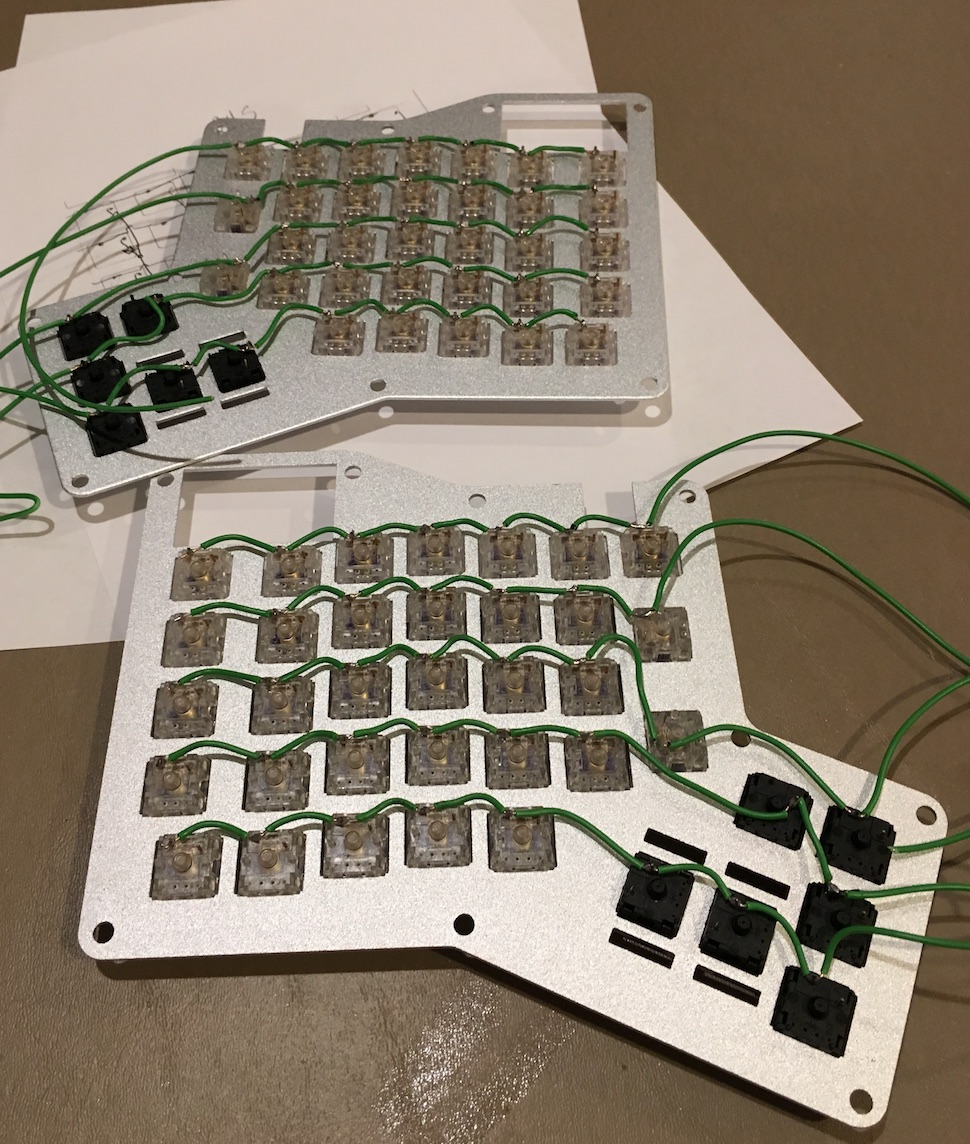
When the diodes showed up I soldered them together on the left hand side. I’m
old and sitting down soldering for a lot time makes my back hurt, so I just
finished up the left hand side (probably not the smartest, because the right
hand side is the master, here, so I had to mess with both chunks of Wez’s code
now. Here’s the left hand side all dioded (that’s a word!) up.
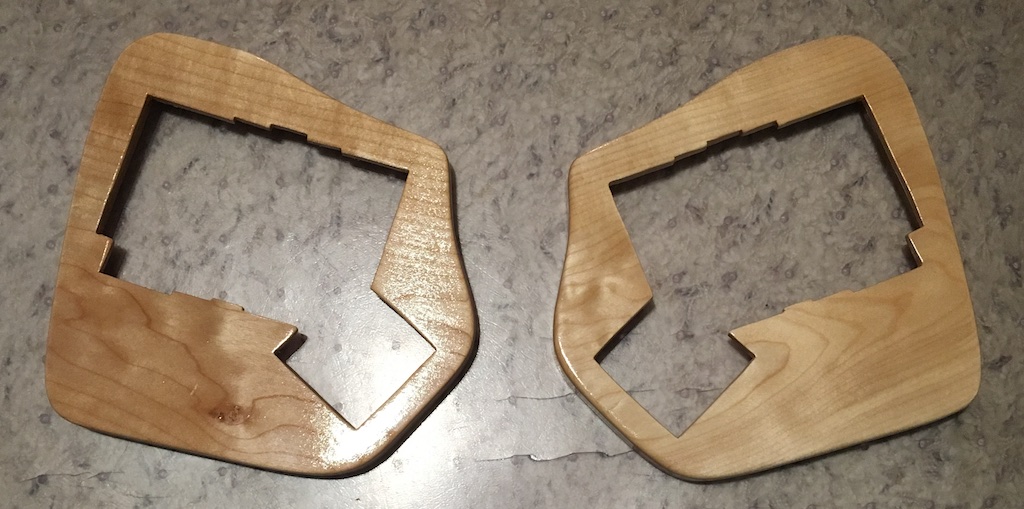
Case Design
I already had an AutoDesk Fusion360 project for my ErgoDox Infinity to build a nice hardwood case. The ErgoDox I use at work is in a black limba case that looks quite nice). Based on that, I’ve added carve-outs for the battery & AdaFruit in the underside of the wrist rest. Time to spin up the CNC machine.
I have an E3 CNC from BobsCNC. They kit came with a damanged piece, which they replaced quickly after a quick conversation on FB Messenger. The device itself is capable, but it’s clearly focused on simple engraving kind of stuff. The router is a wee bit under powered, but the real issue is that the gantry (look, Ma, official words!) is just not sturdy enough to handle something more powerful, so it results in things taking a long time to mill, because you have to go really slowly. And going slowly is frequently really hard on both the stock, and the cutter. If I had it to do over again, I think I’d go with an X-Carve or Shapeoko. I’m going to wind up upgrading to something much nicer when I haven’t purchased so many other expensive things in a while. If I had either of the other two, I’m guessing I probably wouldn’t be upgrading for a much longer time. Though, I think the E3 has more Z-Axis distance than either of the other two. Right now, I’m either going to go with something really pricey, or just say something like the MillRightCNC Power Route is all I’ll ever need.
I grabbed a couple of chunks of maple from Crosscut Hardwoods in Seattle on the cheap, because they only had to be about 9 inches square. This is a real advantage of a 2 piece keyboard. You can use cheap scrap end-chunks of wood for the cases. I milled them on my CNC and then spent a bunch of time widening the cavity for the switch plate by hand (you’d think after my previous experience, I would have learned my lesson, but I didn’t). Next I screwed the switch plates into position. I started with the right side, and realized that I didn’t have enough space under the BLE PCB for the wires, so on the left side, I remedied that situation.
The little cut-out above the thumb cluster is for a hinge to hold the leg. I like my keyboard tented up a bit, but I use a keyboard drawer at home, so the legs will fold down to allow the drawer to close up and hide the horror of my messy desk.
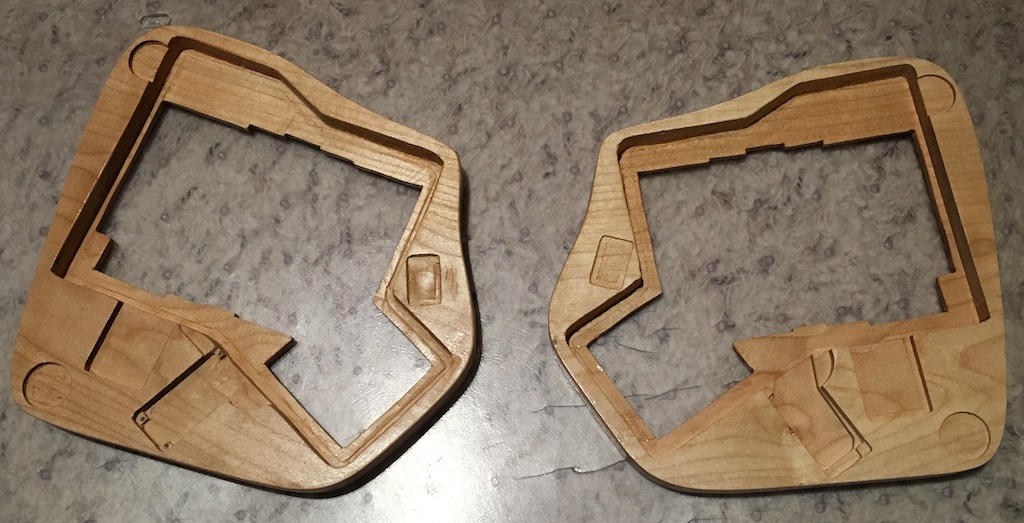
I’ll upload my Fusion360 project somewhere accessible if anyone asks (probably not up here: I have no idea how well a f3d file versions…)
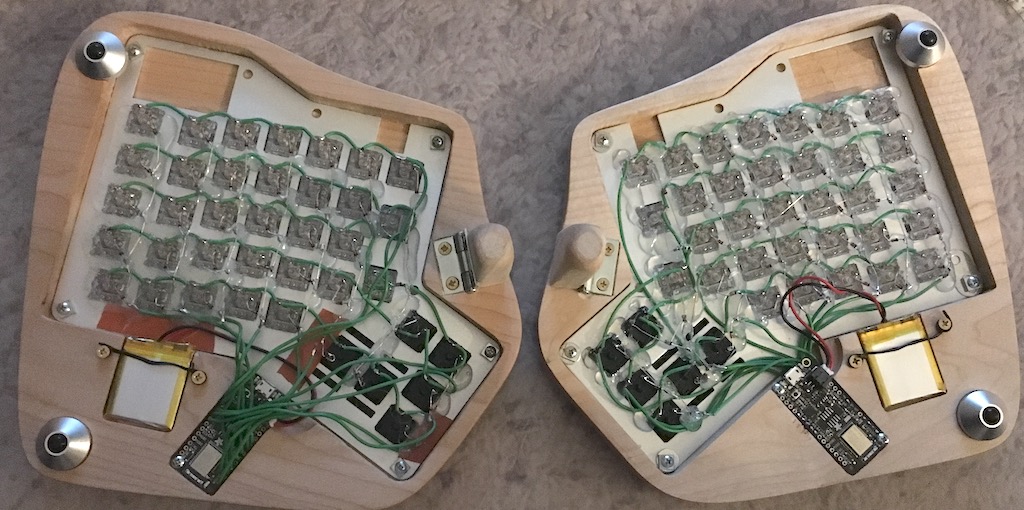
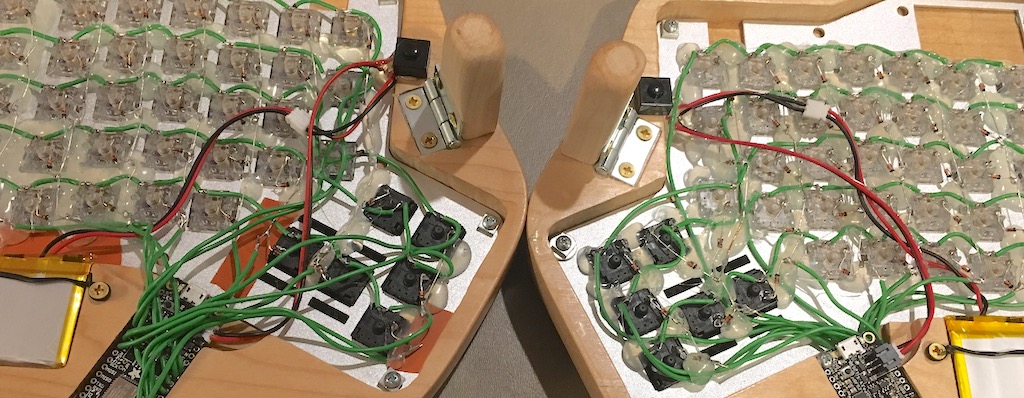
At this point, I trimmed & soldered the wires up (on top for the right side, underneath for the left, which looks much better because of this) and then screwed the AdaFruit board in place. I messed up at this point, crushing the charging LED on the left side. It still appears to hold a charge, but the light doesn’t work anymore :(. I keep the batteries in place with just a little black wire tie that you can find in a drawer or on a shelf, or where ever electronic cables are sold. I was using #4 3/8” screws everywhere, though the heads are bigger than necessary (thus causing the crushed LED). I predrilled everywhere because maple is hard, and the case might crack if I didn’t. After than I hot-glued the living crap of the thing. I still expect that pulling keycaps off risky (which I’m going to risk, anyway, because I prefer my XDA Canvas keycaps over the DSA Granite ones I put on this thing while still ‘in development’).
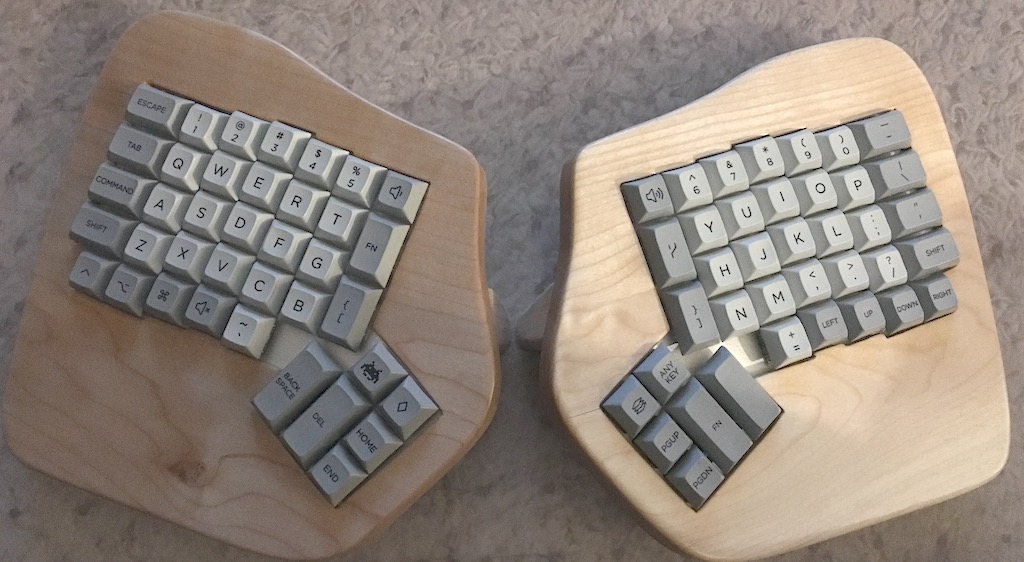
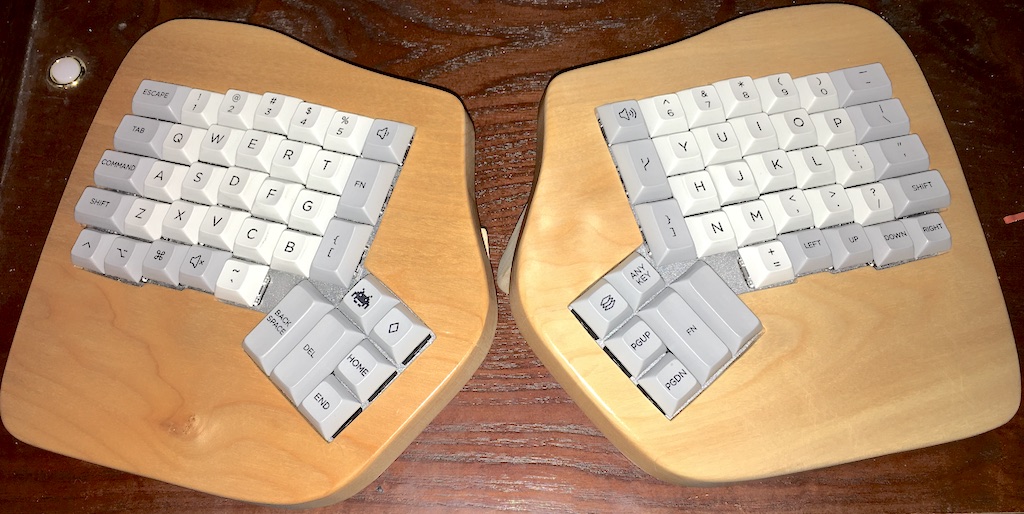
Here’s a nice picture of it after all the ‘hardware’ parts of the project are complete. The only thing I haven’t done is seal the little hinged legs.
And here’s a top view:
And, after everything was done, I realized that I needed power switches, because 500mAh isn’t sufficient to last more than a day or so. So here’s a new picture of the underbelly of my keyboard halves:
Software Story
Currently supported features
- Layers (up to 8 active at any point)
- Layer shifting, Layer toggling, and layer switching
- If you hit both shift keys, and the keys immediately below at the same time, you’ll get a battery report typed out to the text console. I plan on adding more diagnostics (Layer stack info, anything else useful) as time goes on.
- Key actions that are modifier sets + key presses
Most of the capabilities already existed in Wez’s original Gist.
Live Blog, after the fact
I’m logging what I’m doing here, paragraph by paragraph.
I have some seriously wacky layering going on in my original ErgoDox firmware (which you can check out in my KLL fork, if you feel like it) but I plan on starting this out as a normal Mac keyboard layout, without doing too much else. I modified Wez’s software in a couple of core ways, thus far. The biggest thing I did was to change the slave to just send the raw 6 bytes of data every time something changes (5 bytes of matrix data, 1 byte of battery info). I don’t think I’ll have to change anything on the left hand side now. I also really hate doing anything significant with the preprocessor, so I might try to make something a bit more C++-ish with the actual keymapping code.
Update: Hahaha. Wez clearly knew what he was doing, because sometimes that
stupid 6 byte payload gets cut down to only about 4 bytes, thereby messing
things up. I’ll have to go back to just sending keycodes. I’d still like to try
to report battery data for the left side. No matter: I’ve currently got a pretty
much fully functional keyboard (without any of my fancy extras), so I’m going to
call it a night (and a weekend). The code seems to work alright, though it might
be just a tad laggy. No more wires on my desktop for my keyboard! W00t! (And
yes, I noticed that I messed up the V and C keys, but my fingers know which is
which, and I’m going to switch the keycaps with my old monstrosity anyway, so
I’ll fix that soon enough
Okay, I’ve debounced the switch reading code. I also have 3 layers, now, and I added layer toggling, layer switching, and layer shifting. The biggest remaining feature I need (the only?) is the ability to bind a key action to a key plus a set of modifiers. (Turns out Wez already had that) The other thing I think might be cool is to be able to send some data over the keyboard. I’ve seen this called things like “console mode”. Something like a battery report, and layer stack or something, by hold both shifts & both ‘controls’ (the outer, lower key, right below shift)
Got the Console Mode added: type_string and type_number are both a thing now. If you want to add macros, that code is probably where you start. When you hit the keys I mentioned above, you get the battery levels, along with the keyboard layer list, typed out wherever you happen to be. Hurray, I have printf debugging without needing a wire :D
Future Plans
- Add a default layer setting doodad when the initial bluetooth connection is made. Given that the indicator isn’t obvious, I find this regularly frustrating…
- Add an LED or two or three to indicate layer/mode stuff: There’s a nice spot for it where the LCD screen went on the Infinity…
- Upload my Fusion360 project for the wood case
- Maybe add an OLED screen? I kinda miss that from my Infinity ErgoDox. There’s a little 128x32 doodad from AdaFruit for pretty cheap that looks like it just attaches, but it’s not clear to me if it eats all my GPIO pins or not…
Known issues / bugs / TODO’s
- The right hand side battery doesn’t seem to update after boot. Weird.
- I’d like to add key sequences as a base capability. It’ll be a little clunky, because I think doing so inline will be prohibitive.
- I should make sure that I’m consistent with trailing underscores indicating a full keycode, rather than something that needs to be used in a KEY() or MOD() macro.
- Testing. Testing would be good.
Useful links
AdaFruit links
Next project
This has been super fun. Once I’m done with this project, I’m going to try to make a fully custom keyboard with a PCB that I mill on my CNC, with a purple heart hardwood case. The primary complaint I have about my ErgoDox is the lack of a decent place to put a set of arrow keys. I’m going to try to address that and maybe shrink the thumb cluster and remove the extra index-finger row. Wish me luck!